When I first started out printing, I used metal gauge pins on my tabletop press. Now I prefer the disposable paper gauge pins made at home. I had a very tight registration to do for a client once and broke a metal one having to shift my paper around to find the perfect position. I was a little sad about it and rather than break another, my husband jumped in and suggested we make some paper ones.
Paper ones give me a lot of leverage when I have to reposition my paper to get the colors to line up perfectly. They are inexpensive, easy to make and work well in my opinion.
If you want to make your own, read on!
 |
| PAPER GAUGE PINS |
Use heavy cardboard because it’s extra sturdy.
Cut your cardstock into perfect squares first before cutting down to actual size. To cut into perfect squares,
use a ruler alongside your trimmer to make sure you are lined up at a 90 degree angle perfectly.
Move your card stock around clockwise and trim all four sides.
 |
| CUTTING CARDBOARD TO PERFECT SQUARES FIRST |
There are two pieces to cut to size to make your paper gauge pins.
First cut the longer strip. The length is roughly 5 cm long and 1,5 cm tall. You can make it a little shorter if you want; the important part is to
be sure that it’s straight, because your paper should sit straight inside them too.
The tab you cut out to sit on top is roughly 1,7 cm long and 2,2 cm tall. It
will be centered in the middle of your strip to hold your paper in place. Again,
try to make tabs as straight as possible, if they’re not perfect ok, but the longer strips should be.
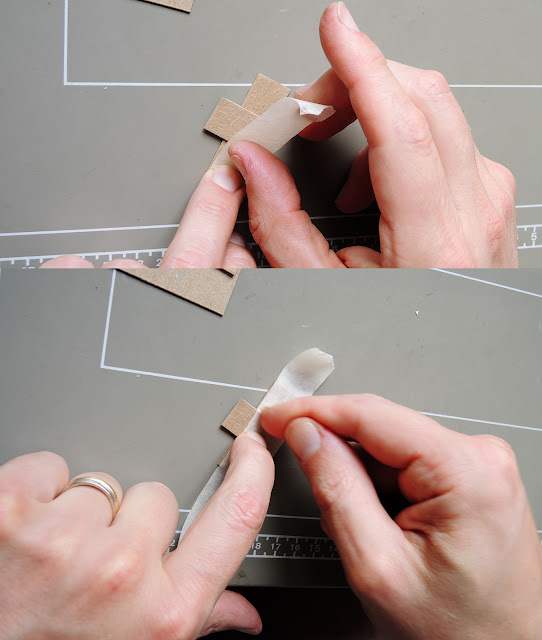 |
| WRAPPING TAPE AROUND |
To securely attach the two pieces together you need to
use strong tape.
Wrap the tape around onto the backside too.
The tape shouldn’t over extend
on the top side and
must be flush as shown on the image below. This is where you will put your paper inside.
Make deep creases using your finger along side the tab.
Your tape can and
will extend over onto the bottom side, but you’ll
trim it
with scissors at the end. Credits to my husband, the hand model (wink).
 |
| CREASED TAB AND CUTTING EXCESS PAPER OFF BOTTOM |


